800 633 3047
  • English version of websiteUS / English
    • Portuguese version of websiteBrasil / Português
    • Spanish version of websiteMexico / Español
register or Login
Register
Forgot password
Home All Products New Products My Account Blog
View cart 0 items
Polyvance logo

View cart

0 items

We help people repair plastic

  • Home
  • All Products
  • New Products
  • My Account
  • Blog

Home Repairing thermoset plastics
Information
Auto & Truck Part Repair
Broken Grille Repair
Dashboard Restoration
Fan Shroud Repair
Padded Dashboard Repair
Plastic Radiator Repair
Radiator Overflow Tank Repair
Steering Wheel Restoration
Textured Plastic Bumper Repair
Aircraft Repair
Airplane Canopy Repair
Instrument Panel Repair
Bumper Repair
Bumper Grille Bar Repair
Bumper Repair Flow Chart
Camry Bumper Repair
Ford F150 Textured Plastic
Flange Repair With Nitrogen Welder
Hinged Tab Replacement
Infiniti FX45 Bumper Repair
Mercedes ML320 Bumper Repair
Recreate Missing Bumper Piece
Repair and Retexture Bumper
Tab Repair With Nitrogen Welder
Dirt Bike and ATV Repair
How to Repair ATV Plastic
How to Paint ATV Plastic
Farm Equipment Repair
John Deere Lawn Tractor
Poly Pipe Repair
Spray Tank Repair
Stock Tank Repair
Water Tank Repair
Kayak and Canoe Repair
Large Truck Repair
Kenworth Hood Repair
Playground Equipment
Playground Slide Repair
Street Bike Repair
Repair Broken Fairing
Replace Missing Tab
Create Missing Piece
Watercraft Repair
Sea-Doo Polytec Hull
SMC Hull Repair
Documents
Bumper ID Table
Catalog
Product Info
Product Images
Safety Data Sheets (SDS)
"The Book" of Plastic Repair
How To...
Identify Plastics
Refinish Plastics
Repair Plastics
Nitrogen Welding Information
Polyvance University
Standard Operating Procedures
3804 Flextex VT SOP
Polypropylene Repair SOP
Metton (DCPD) Panel Repair SOP
Slot Tab Repair SOP
Padded Dashboard Repair SOP
Nitrogen Plastic Welding SOP
Airless Welding SOP 1
Airless Welding SOP 2
Kayak Repair SOP
Testimonials
Training
Bumper Recyclers
What is bumper recycling?
Bumper Identification
Welding Rod List
Video
Agricultural Repair
Airless Fusion Welding
Bumper Cover Repair
Dashboard Repair
Equipment Maintenance
FiberFlex Repair
Heavy Truck Repair
Kayak Repair
Miscellaneous Repairs
Nitrogen/Hot Air Fusion Welding
Paint/Texture
Plastic Identification and Information
Plastic Pointers - Quick Tips
PlastiFix
Products and Tools
Radiator Repair
Thermoset Polyurethane (PUR) Repair
Products
Best Sellers
CLOSEOUT SPECIALS
Adhesion Promoter
Filler Prep
Plastic Magic
Aluminum Tape
Bumper & Cladding
Adhesion Primer - Original Formula
Adhesion Primer - Low VOC
Color Coat
Cleaners
EcoPrep
Super Prep
Everything Else
Fiberglass Cloth
Tab Magic
Fillers
Cream Hardener
Flex Filler
Hardset Filler
Padded Dash Filler
Heavy Truck Hood Repair Kits
Insta-Weld
Plastic Sheets
Polyethylene Sheets
Polypropylene Sheets
Plastic Stapler
Hot Stapler
Staples
Plastic Welders
Most Popular Plastic Welders
Airless Welders
ATV Fender Welders
Hot Air Welders
Kayak and Canoe Welders
Nitrogen Welders
Nitrogen Welder Accessories
Plastic Radiator Welder
Plastic Welding Rods
Assortments
ABS
Acrylic/PVC
ASA
FiberFlex
GTX (PA+PPE)
HDPE + GF15
Nylon (PA)
PBT
PC+ABS
PET
POM
Polycarbonate (PC)
Polyethylene (HDPE)
Polyethylene (LDPE)
Polypropylene (PP)
Polyurethane
PP + GF15
PPE+PS
PPX (PPE+PP+GF30)
PVC
TPO
PlastiFix
PlastiFix Kits
PlastiFix Refills
Primer
Waterborne Primer
Primer Catalyst
Reinforcing Mesh
Sealer
Texture Spray
Flex Tex
Tools
Applicator Guns
Body Bags
Dent Drivers
Die Grinder Bits
Pliers
Rod Organizer Cases
Rollers
Sensor Hole Cutters
Tab Tools
Whip Hose
Workstation
Training
Parts
Welder Parts
Airless Welder Parts
Hot Air Welder Parts
New Products
Discontinued Products

Repairing thermoset plastics

Thermoset weld

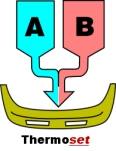
Automotive urethane, or PUR, is a thermoset material. Similar to what happens when you mix body filler and cream hardener, it is formed when two liquid chemicals come together in the mold to form a solid. The point of telling you this is to say that you cannot melt urethane bumpers with the welder. Repeat: YOU CANNOT MELT URETHANE BUMPERS WITH THE WELDER!

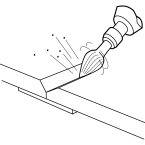
A sure-fire way of identifying a urethane bumper is to lay your hot welder on the backside. If it's a urethane, the plastic will liquefy and bubble and smoke will rise (note: welder must be extremely hot for this to happen).

After this "melted" area cools off, it will still be sticky to the touch. This is an indication that the heat actually broke down the chemicals in the plastic. Thermoset urethanes can be easily repaired with the airless plastic welder, but the repair will be more like a brazing process rather than a true fusion weld.

See how heat will damage thermoset urethane.

V Groove

V-Groove Damaged Area

· Line up the outer surface of the tear with Aluminum Body Tape or with clamps.

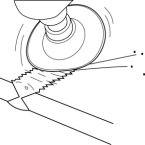
· V-groove halfway through the backside of the part with the 6121-T Teardrop Cutter Bit. You cannot use a hot tool to melt the v-groove into urethane because thermoset urethane does not melt.

· Sand the v-groove with coarse sandpaper (80 grit or coarser) to put some extra "tooth" in the plastic. Also remove the paint in the area surrounding the v-groove and radius into the v-groove for extra strength.

Weld

Melt Rod into the V-Groove

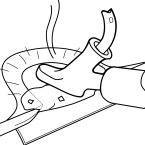
· Set the temperature setting of your airless plastic welder to the urethane rod setting. Using the R01 Polyurethane welding rod, the rod should come out of the bottom of the welder's shoe completely melted and clear, not discolored or bubbling.

· Holding the welder's tip off the surface of the plastic, melt the rod into the v-groove. Don't overheat the base material, simply melt the rod onto the surface. Again, you are NOT trying to melt the rod and the bumper together; the bumper material is NOT meltable!

· Lay down no more than 2 inches of welding rod into the v-groove at a time. Remove the rod from the welder tip, and before the melted rod has time to cool down, go back over it with the hot welder tip and smooth out the weld. Don't overheat the base material.

V-Groove and Weld Opposite Side

After the weld on the backside cools, repeat the v-grooving and welding process on the opposite side.

Grind

Grind Weld to Smooth Contour

Using coarse sandpaper, grind weld to a smooth contour. The urethane welding rod will not feather very well, so it will need to be covered with 2000 Flex-Filler 2 epoxy filler to refinish completely. Grind the weld slightly flush so that filler can cover the welded area completely. Follow instructions for filler application.

Tab Repair

Repairing Torn Bolt holes on Urethanes

· Taper the plastic all around the hole down to a point on both sides using a Roloc disc.

· Use 6481 Aluminum Body Tape to create a bridge across the torn mounting hole. Melt R01 polyurethane welding rod into the area. Drill out hole when finished.

urethane supply company airless plastic welder plastic tank welding plastic welding gun price plastic trim repair pastic welding

Products Used For This Repair

Tear Drop Cutter Bit
6121-T
$ 8.95
Polyurethane, 1/8" diameter, 30 ft, Natural
R01-01-03-NT
$ 29.95
Flex Filler Epoxy Kit, Tubes
2000-T
$ 28.95
1 inch Aluminum Tape
6481-1
$ 65.95
Tweet
QR Code for this page
qr code
Use your smartphone`s scanner to share this page with a friend.
Quick Links
  • About Us
  • Contact Us
  • International Distributors
  • Newsletter
  • Nitro Fuzer Distributors
  • Private Label
  • Terms and Conditions
  • Testimonials
  • Time Line
Our other sites
  • dBumper
  • Facebook
  • Instagram
  • LinkedIn
  • Pinterest
  • TikTok
  • Twitter
  • YouTube Channel
  • br.polyvance.com
  • polyvance.mx
Other Links
Collision Education Foundation

©1997-2025 - Polyvance

Programming and design:

CodeIT